Design Steps 6, 7,& 8
Steps 6, 7, and 8 are all kind of combined because they helped me and my group to wrap up the project and finalize details, but the bulk of the project was already done. We worked towards promoting our product in hopes of gaining possible funding, and presenting our work to others. To promote our work, we created business cards, virtual posters, a team website, and a commercial. We also had individual tutorials to work on. The work we did and the way we broke it up is shown below.
Steps 6&7 Week 1:
1. 3D model a Buildable Functioning Prototype
2. Develop a Team Website with all components of our project
Steps 6&7 Weeks 2&3:
1. Continue working on team website
2. Prototype Testing
3. Tinkercad Tutorials
Step 8 (3 weeks):
1. Capstone Project report,
2. Digital Technical posters (check HERE for details),
3. Flyers/Business cards,
4. Final presentation with voice over,
5. Virtual Demonstration (show your project in action).
Steps 6&7 Week 1
Buildable Functioning Prototype
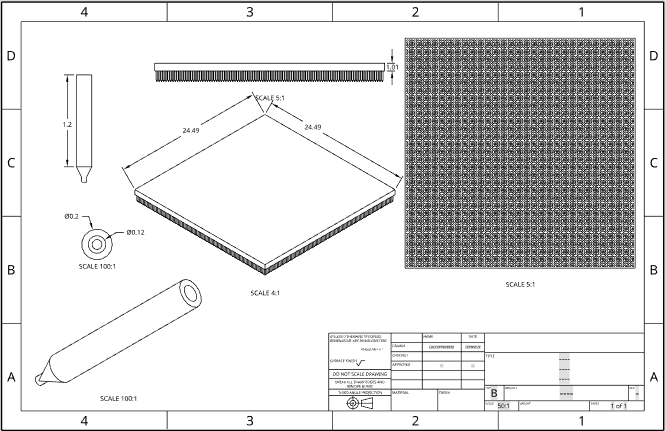
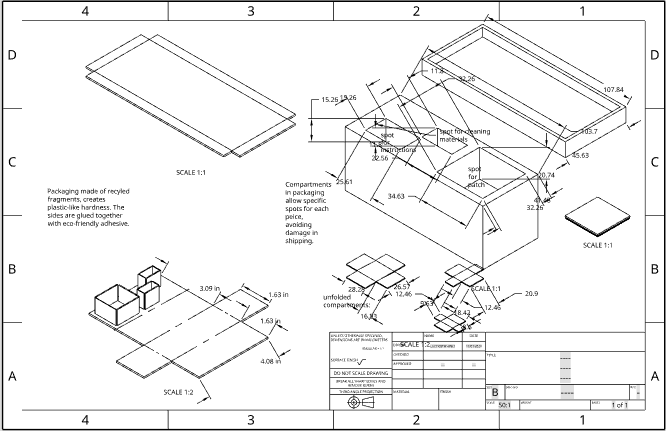
Shown below are the blueprints for our prototype. One blueprint shows the details for the patch, including the dimensions and angles. The patch blueprint includes all of the views for the patch and a zoomed-in view of what the microneedles would look like. It shows how the needles are hollow and can be filled with a microneedle. The other blueprint shows the dimensions and angles of the packaging. The blueprint shows how each part of the packaging can be unfolded, and the purpose of the separate components in the packaging, which is to keep everything in its place during shipping to avoid damage. That is because our product is meant to be able to be used outside of hospitals, so it may be needed to be shipped very long distances.
|
|
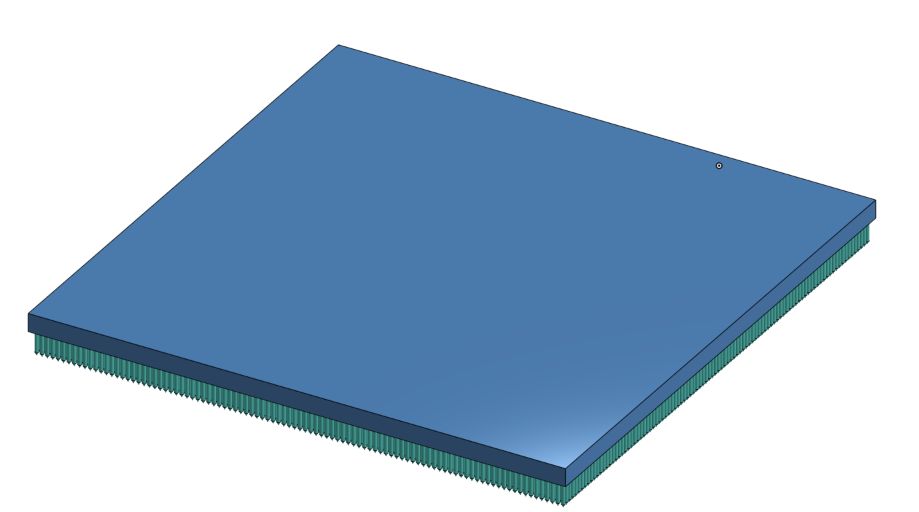
Below is the 3D model of our patch. The dissolvable microneedle has a shape that is part cone and part cylinder. The cone-shaped end was proven to cause the least amount of skin breakage in one of our experiments. This model shows how the needle is hollow. The inside would be filled with the vaccine and the outside would be made of dissolvable hyaluronic acid. The patch itself includes an adhesive patch, a polymer baseplate and 9,801 dissolvable microneedles.
Team Website
We also created a team website that can be used to market and promote our project. The goal would be to gain funding and support. We worked on this all throughout the last steps of this project, and it includes every step and document that we worked on this semester.
Steps 6&7 Week 2
Prototype Testing
Unfortunately, we were not able to conduct a physical test for our prototype due to lack of resources. Instead, we created detailed blueprints for our product and followed the testing and results of a lab funding a similar design. Hypothetically, we could have followed our manufacturing process designed in Step 3 to create a functioning prototype, but we would have needed access to a safe lab with all equipment, pure hyaluronic acid, a vaccine strain, and a test subject.
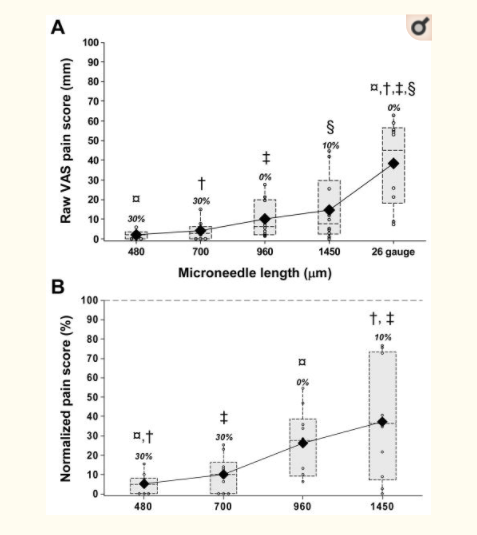
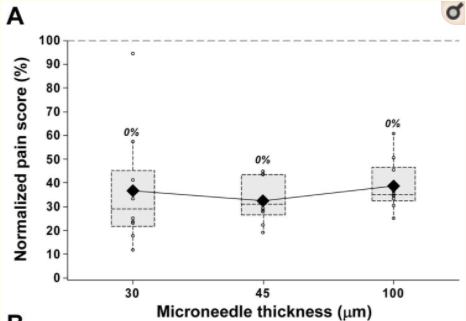
The lab report we followed was conducted at the Center for Drug Design, Development and Delivery and the Institute for Bioengineering and Bioscience at the Georgia Institute of Technology and was funded by the National Institutes of Health.
These scientists tested the amount of pain caused by each needle by inserting between 1 and 50 microneedles with lengths ranging from 480 to 1450 μm, widths from 160 to 465 μm,thicknesses from 30 to 100 μm and tip angles from 20° to 90° into the forearms of ten healthy, human subjects in a double-blinded, randomized study.
Results:
|
|

|
Analysis:
These results show that needle length affects the pain score more than any other factor in microneedles, so to improve the pain score for microneedle patches the length is what would need to be changed in order to create the biggest difference. Also, this lab coincided with our experiment results from previous design steps, so this allowed us to feel like we were on the right track with our design.
These results show that needle length affects the pain score more than any other factor in microneedles, so to improve the pain score for microneedle patches the length is what would need to be changed in order to create the biggest difference. Also, this lab coincided with our experiment results from previous design steps, so this allowed us to feel like we were on the right track with our design.
Tinkercad Tutorials
The tutorials that we followed with Arduino and Tinkercad are as follows:
1) Introducing the Breadboard
2) Ohm's Law
3) Series and Parallel Curcuits
4) Project 0: Introduction
5) Project 1: Get to Know Your Tools
6) Project 2: Spaceship Interface
1) Introducing the Breadboard
2) Ohm's Law
3) Series and Parallel Curcuits
4) Project 0: Introduction
5) Project 1: Get to Know Your Tools
6) Project 2: Spaceship Interface
Step 8
Capstone Project Report
Digital Technical Poster
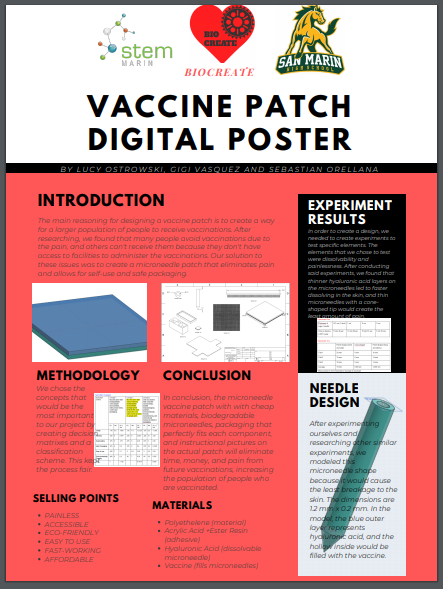
Creating a Technical Poster allows us to display our team and project to a large audience in hopes of gaining support from possible funders. The poster is designed to catch people’s attention and give them an overview of what we’ve been working on. The poster that we created using the site "Canva" is shown below. It includes an introduction, methodology, experimentation, designs, highlights, and a conclusion.
Flyers/Business Cards
The business card below gives possible funders access to contact our team and look at our project through our website. It is a way to quickly get our names out there, and would be used in the occasion of a presentation of conference.
Commercial
Another way that we promoted our project was with a commercial, which is linked in our final presentation. The commercial just highlights the overall concept of our product, and explains why it is better than other products out there.
Final Presentation with Voiceover
We created a presentation with all of the information on our product. It includes every step that we took to get to the final version, and everything that we learned along the way.
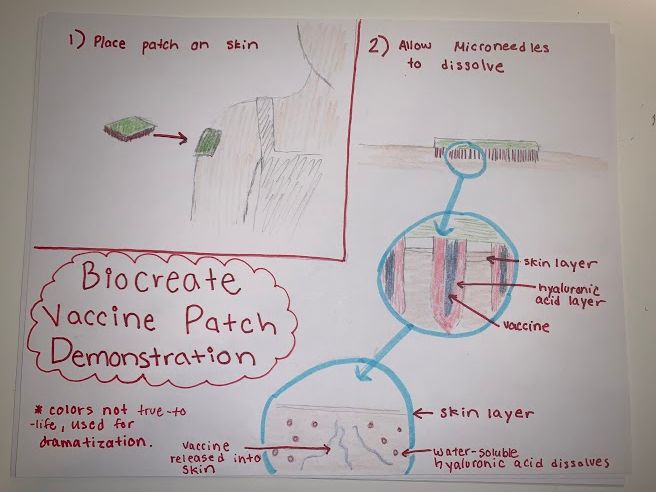
Virtual Demonstration