Design Step 4
The goal of Step 4 was to come up with detailed designs of our projects, to plan and conduct experiments, to create a lab report and to continue working on online modeling and circuits. We completed the designs, experiments and lab reports as a team, collaborating and breaking up work. We also consulted with our mentor to gain further knowledge on how to solidify our project. The modeling and circuits were individual assignments. These assignments were all split up among two weeks:
Week 1:
- Work on 3D prototypes and 2D blueprints
- Plan and set up detailed experiments
- Run the experiments/tests
- 3D tutorials
- Work on 3D prototypes and 2D blueprints
- Plan and set up detailed experiments
- Run the experiments/tests
- 3D tutorials
Week 2:
- Complete the Lab Report
- 3D tutorials
- Tinkercad Tutorials
- Work on detailed digital drawings
- Complete the Lab Report
- 3D tutorials
- Tinkercad Tutorials
- Work on detailed digital drawings
3D prototypes and 2D blueprints
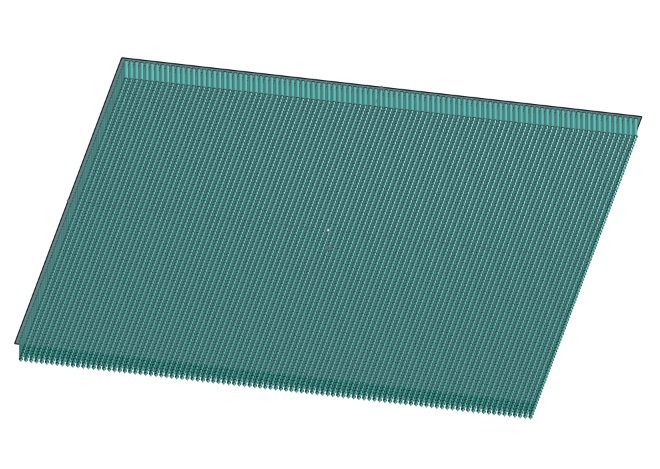
Since this class has been virtual due to the world's circumstances, the prototypes for our project had to be virtual as well. We used a 3D modeling site called Onshape to come up with our detailed designs. This allowed for a good amount of flexibility, since we had to experiment in order to finalize our designs. We also created 2D blueprints that include scaling and measurements. This is designed to be ready to send to companies that could possibly manufacture and produce our design.
|
|
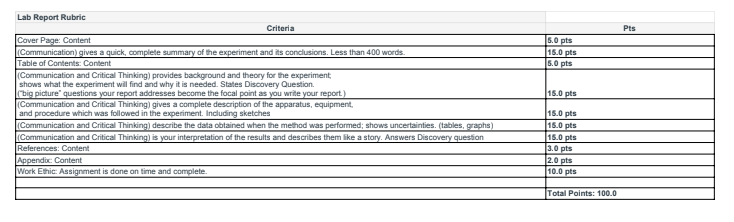
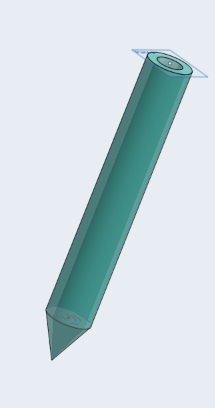
Above are the 3D designs made on Onshape. The first image is a detailed design of the microneedle, which would have a dissolvable outer-layer encapsulating the vaccination. The second is a 3D model of the patch, which is made up of an adhesive patch and thousands of microneedles. Below is a copy of the 2D blueprints made from the 3D models above. This provides dimensions and scaling for future manufacturers.
Plan and Set Up Detailed Experiments
In order to come up with a design for our vaccine patch, we needed to prove which details of the design would work best. To do so, we needed to specify the details of the design so that it can be manufactured, by following instructions. Those details are the dimensions and material composition of parts, as well as the methods used to join them. We decided to conduct two experiments to prove the two main functions of our product: painlessness and dissolvability. The setups for those two experiments are shown below.
3D Tutorials
Aside from the experiment planning and conducting, we were individually assigned 3D modeling tutorials on three platforms: Onshape, which we have been using in the past, Simscale, which connects to Onshape, and Tinkercad. The Onshape and Simscale tutorials taught me to 3D model and are working towards teaching me how to 3D print, which is a super helpful tool in the engineering world. Tinkercad provided tutorials regarding circuit simulations. Overall, these tutorials were intended to teach us the basics of modeling and engineering without needing a teacher or classroom, which is very convenient in these times.
Lab Report
The next step after planning our experiments was to carry them out. We split up the experiments and conducted them at home, making sure to record every step. Due to the fact that they were done at home rather than in class, the experiments definitely had blips and small issues, but they gave us the answers we needed. The lab report for these experiments is shown below.