Design Step 2
The second design step was focused on narrowing down our project ideas by choosing alternative designs and collaborating with our mentors, teammates and teacher. Another main part of this step was learning how to create conceptual sketches through video tutorials, and the description and pictures of those are on the page with Design Step 1. Choosing alternative designs came with many assignments including charts, papers and classification schemes. All of these assignments took loads of effort due to many revisions to make sure that our project was as good as possible. An overlying goal for all of the steps in this project remains encouraging students to be NUSD's 6C's: Communicators, Critical Thinkers, Collaborators, Conscientious Learners, Culturally Competent and Characters.
Part 1:
1. Brainstorm on your journal and padlet to determine at least three feasible alternatives (concepts) for each function/subfunction of your product and assemble the results in a classification scheme.
2. Functionally decompose your product.
3. Form three promising design concepts by combining compatible function-subfunction alternatives/concepts from your classification scheme
4. Sketching tutorials part 1 (Technical Drawings 1 & 2, Orthographic Drawing, Perspective)
2. Functionally decompose your product.
3. Form three promising design concepts by combining compatible function-subfunction alternatives/concepts from your classification scheme
4. Sketching tutorials part 1 (Technical Drawings 1 & 2, Orthographic Drawing, Perspective)
The first part of Step 2 was mainly about brainstorming the different concepts of our project. These are also known as alternatives. This basically means we brainstormed all of the functions that we wanted our design to have and then the possible ways we could get those results (subfunctions). The first way we brainstormed this was through Padlet, and the link to that is shown below.
The next step was to functionally decompose our product into all of its many valuable functions. To do so, we created a functional decomposition flow chart/ mind map, which is linked below. This was done on a site called Coggle, which is very similar to padlet, where you can write ideas down, move them, connect them and add to them all virtually.
After functionally decomposing our product, we started creating our Classification Scheme. Right off the bat, the goal for this document was a bit unclear. My teammates and I were not on the same page about what needed to be on this Classification Scheme, so turning in the assignment was rushed and last minute. To get to where it is now, we needed to revise this document for weeks on end, getting revisions from both our teacher and our mentor. We eventually learned how the document was supposed to look, and added the needed details to make it correct. The process was definitely more stressful for me than it needed to be, but the end product, shown below, definitely demonstrates how much hard work was put into it.
We also needed to include thought processes for our classification scheme, so here is what we wrote for that:
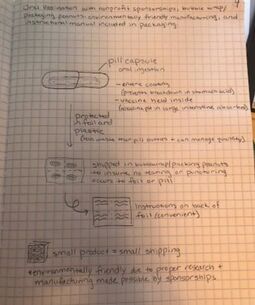
If a more traditional approach in vaccines is required, then a topical anesthesia could reduce the pain experienced by “the needle”.
Vaccines need to go through the bloodstream, so needles are the most efficient.
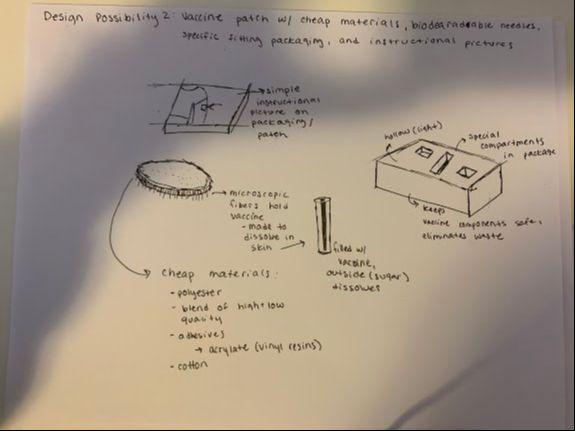
Affordability: We need to research how easily it can be accessed, and what materials are available. Once we research the materials, we could find an average price.
Questions to answer: How can we make this biodegradable and safe to the body?
Would it be possible to administer over the counter? Or would it need to be more professional for safety reasons?
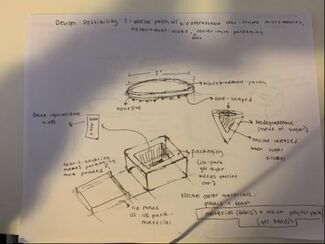
Safe packaging: Since this vaccine will need to be administered all over the world, safe packaging that includes a detailed users manual will be provided. The safe packaging will ensure that the patch will come intact. Fool-proof way of opening in order to maintain sterility.
In order to administer a vaccine, some penetration of the skin is necessary for the vaccine to reach the blood, but micro- needles will not draw blood or cause pain.
This would not penetrate skin enough to hurt and would probably be more effective and faster than the oral vaccine because the oral needs protection from stomach acid.
If a more traditional approach in vaccines is required, then a topical anesthesia could reduce the pain experienced by “the needle”.
Vaccines need to go through the bloodstream, so needles are the most efficient.
Affordability: We need to research how easily it can be accessed, and what materials are available. Once we research the materials, we could find an average price.
Questions to answer: How can we make this biodegradable and safe to the body?
Would it be possible to administer over the counter? Or would it need to be more professional for safety reasons?
Safe packaging: Since this vaccine will need to be administered all over the world, safe packaging that includes a detailed users manual will be provided. The safe packaging will ensure that the patch will come intact. Fool-proof way of opening in order to maintain sterility.
In order to administer a vaccine, some penetration of the skin is necessary for the vaccine to reach the blood, but micro- needles will not draw blood or cause pain.
This would not penetrate skin enough to hurt and would probably be more effective and faster than the oral vaccine because the oral needs protection from stomach acid.
The final step in part 1 of Design Step 2 was to select three designs from the classification scheme to focus on. This means that we chose three different designs that would include all of the needed functions, but with different concepts. The Three design selections are shown below.
Part 2:
1. Firm up your three design concepts by sketching them in the form of conceptual drawings and by implementing the techniques learned in the sketching tutorials. On paper and Digitally
2. Sketching tutorials part 2 (complex 2-point perspective, Rectangular Planes, Cylinder in a box, Your first product design)
2. Sketching tutorials part 2 (complex 2-point perspective, Rectangular Planes, Cylinder in a box, Your first product design)
Once we chose three promising design possibilities, we sketched them out. At this point in Step 2, we have had a lot of training in conceptual sketches. We had watched around 35 drawing tutorials, taken notes, and followed the tutorials by sketching them out ourselves. Evidence of this work is shown in the page linked below. All of this training led us to practice our skills on the conceptual drawings shown below. We also learned how to create digital drawings, but that is in Design Step 3.
|
|
|
